
As an Amazon Associate, I earn from qualifying purchases at no extra cost to you.
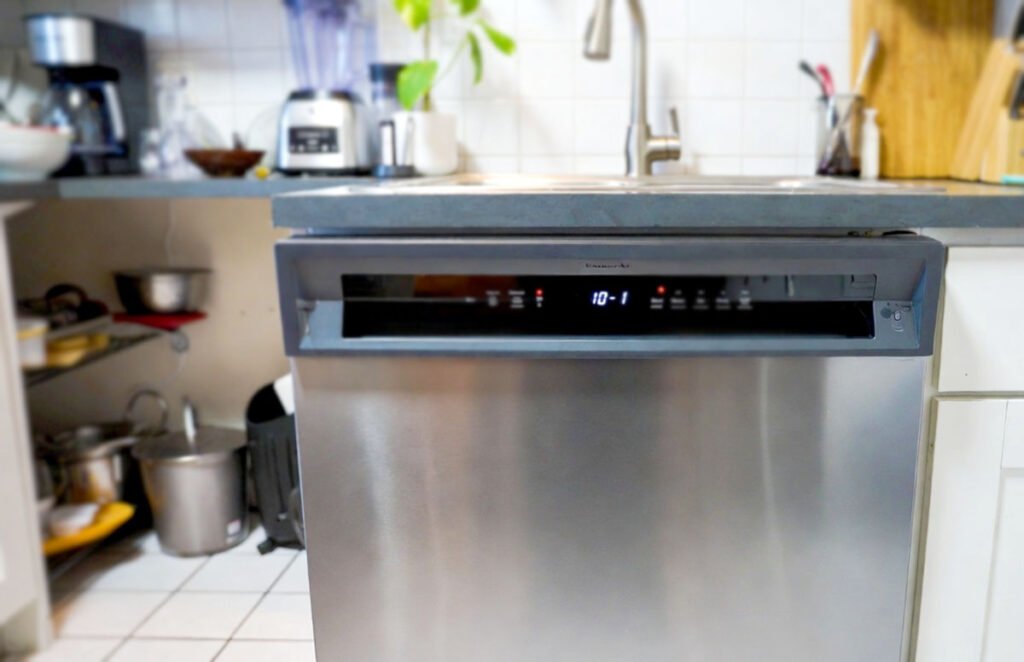
KitchenAid Dishwasher Error Code 10-1 (Fix It Now Easily)
 ByZayyan
The kitchen was already a mess, soap on the counter, dishes half loaded, then the KitchenAid froze mid cycle and flashed 10-1. I have seen this exact scene a thousand times, door open, steam gone, water cold, frustration boiling. In this article I break down exactly what that code means and how to fix it without guessing.
You start by cutting power at the breaker and confirming the water inside never heats. You check the heating circuit from the tub to the control, not just one part. You test resistance with a basic meter and clean hidden connections. You replace only what fails the test, then run diagnostics to confirm the fix before trusting a full load again.
What is KitchenAid Dishwasher Error Code 10-1?
This error means the dishwasher thinks the water never heated properly during the cycle. The control board watches temperature rise through a sensor called a thermistor. If that rise does not happen in a set time, the machine panics and throws 10-1. It is not guessing, it is reacting to cold water where heat should be.
Most of the time the heater itself is fine, but power never reaches it. KitchenAid units hide a thermal fuse in the door and route heater power through the control. One loose spade connector or a weak relay can stop heat completely. The unit still fills, sprays, and drains, which tricks people into chasing the wrong parts.
Less often, the thermistor lies. It tells the board the water is already hot or never warming. When that happens, the board shuts the heater down for safety. This code shows up after normal use, power outages, or a long cycle with heavy soil that stresses the heating circuit.
- Burned heater relay on control board
- Open heating element under the tub
- Loose spade connector at the heater terminals
- Failed thermistor in the sump
- Blown thermal fuse inside the door
- Low incoming water temperature from the home
How to Fix Your KitchenAid Dishwasher Error Code 10-1
Step 1: Kill the power and pull the unit safely
Start at the breaker panel and shut off the dishwasher circuit. Do not trust the door switch alone. I always confirm with a non contact tester at the junction box under the sink. Grab a T20 Torx driver, a 1/4 inch nut driver, and a towel. Open the door, remove the two T20 screws holding the unit to the counter. Slide it out just enough to access underneath.
Lay the towel down because some water will spill from the sump. Disconnect the drain hose clamp with pliers and unplug the power cord or hard wire connections. Take a photo before you disconnect anything. That photo saves time later when frustration kicks in.
Once free, tip the dishwasher gently on its back. This exposes the heater terminals, pump, and wiring harness. You now have full access to the heating circuit, which is where this error lives. Do not rush this part. Slow and careful prevents broken wires.
- Turn off breaker and verify power is dead
- Use T20 Torx and 1/4 inch nut driver
- Take photos before disconnecting wires
- Tip unit carefully to protect hoses
Step 2: Test the heating element under the tub
The heating element sits in a metal channel under the tub with two terminals. Pull off both wires, they are tight so rock them gently. Set your multimeter to ohms. A good KitchenAid heater usually reads between 10 and 30 ohms. If you get infinite or zero, the heater is bad.
While you are there, inspect the terminals closely. I see burned spades all the time. Heat creates resistance, resistance creates more heat, and the cycle continues until failure. If the spade is dark or loose, replace it even if the heater tests good.
Do not assume a warm tub means the heater works. Some models have residual heat from the motor. Only the meter tells the truth. If the heater fails the test, replace it with the exact part number for your model.
- Expected heater resistance is 10 to 30 ohms
- Replace burned or loose spade connectors
- Do not rely on touch to judge heat
- Use model specific replacement parts
Step 3: Check the thermistor in the sump
The thermistor is clipped into the sump, usually near the pump housing. You access it from underneath. Look for a small plastic probe with two thin wires. Release the locking tab with a flat screwdriver and pull it straight out.
At room temperature, most KitchenAid thermistors read around 48k ohms. Put the meter leads on the pins and watch the reading. If it is way off or jumps when you wiggle the wires, it is failing. A bad thermistor confuses the control and stops heating.
Also check for debris around the probe tip. Grease and scale can insulate it, slowing temperature response. Clean it with warm water and a soft brush. Never sand it. If the reading is wrong, replacement is the only fix.
- Typical thermistor reading is about 48k ohms
- Wiggling wires should not change readings
- Clean grease from the probe tip gently
- Replace if readings are unstable or wrong
Step 4: Inspect the thermal fuse inside the door
Open the door and remove the inner panel screws with a T15 Torx. The panel lifts up and off. Inside, near the top, sits a small white thermal fuse clipped to the harness. This fuse cuts power to the heater if the door overheats.
Pull one wire off and test for continuity. It should read closed. If it is open, the heater never gets power. Always replace the fuse with the included wire kit. KitchenAid requires new connectors because old ones cause repeat failures.
Before closing the door, check that the vent fan spins freely. A stuck vent causes heat buildup and blows the fuse again. This is a detail many miss and why the error comes back weeks later.
- Remove inner door with T15 Torx
- Thermal fuse must show continuity
- Always use the new wire kit
- Check vent fan for free movement
Step 5: Examine wiring and connectors end to end
Follow the heater wires from the element to the control board. Look for pinched spots where the tub slides in. Tug gently on each connector. If one comes off easily, it is a problem. I crimp loose terminals with needle nose pliers or replace them.
Check the junction box under the sink too. A loose neutral can cause low voltage to the heater. Measure voltage during a heat phase if you can. You want close to 120 volts at the heater terminals when running.
This step takes patience, but most 10-1 errors I fix are wiring related. Heat and vibration work against these machines every day.
- Inspect wires from heater to control
- Replace loose or burned connectors
- Check junction box connections
- Confirm 120 volts during heat cycle
Step 6: Test the control board heater relay
If everything else checks good, the control board is the last suspect. Remove the board from the door. Look at the solder joints under the heater relay, usually marked. Cracked joints cause intermittent heating.
You can test relay output with the machine in diagnostics, but only if you are comfortable with live voltage. Many homeowners choose to replace the board at this point. Use the exact revision number. Generic boards cause weird behavior.
After replacement, run the service diagnostics cycle. Let it complete fully. This resets stored errors and confirms the heater now raises temperature correctly. Only then load dishes again.
- Inspect relay solder joints closely
- Replace board if relay does not close
- Use exact board revision number
- Run diagnostics to confirm repair
How do I prevent error code 10-1 from coming back?
Always start cycles with hot water at the sink. Run the tap until it is hot, then start the dishwasher. This reduces heater stress and shortens heat time. Cold starts are hard on the heating circuit.
Once a month, pull the bottom rack and inspect the heater terminals for corrosion. Five minutes now saves a breakdown later. Also keep filters clean so the heater does not overwork on long, dirty cycles.
Avoid cheap detergent that leaves heavy residue. Residue insulates the heater and thermistor. Good detergent and proper loading keep water moving and heat even. These machines like balance, not overload.
- Run hot water before starting cycles
- Inspect heater terminals monthly
- Clean filters regularly
- Use quality detergent
- Avoid overloading racks
- Keep vent fan clear
Final Thoughts
This error feels intimidating, but it is a straight line problem once you slow down. Test, do not guess. Most fixes cost less than a service call when done right. Take photos, trust your meter, and fix what fails. When the water heats again, the machine feels brand new, and so does your kitchen routine.
Frequently Asked Questions (FAQs)
Is it safe to keep using the dishwasher with error 10-1?
It is not a good idea. The dishwasher is telling you the water is not heating. That means poor cleaning and possible electrical stress. Continued use can damage the control board or wiring. Stop using it until you at least confirm the heater circuit is intact.
Can this error be caused by my home water heater?
Yes, indirectly. If incoming water is extremely cold, the dishwasher struggles to raise temperature fast enough. This can trigger the code. Running hot water at the sink first usually prevents that. It does not fix electrical failures but helps avoid false errors.
Do I need special tools to fix this?
No specialty tools are required. A basic multimeter, Torx drivers T15 and T20, and a 1/4 inch nut driver handle most of the job. Needle nose pliers help with connectors. These are standard tools for any appliance repair.
Is it always the heating element?
No. In fact, the heater is often fine. Wiring, the thermal fuse, or the control board relay fail more often. Testing each part in order prevents wasting money. Replace only what fails the meter test.
Can I reset the error without fixing anything?
You can clear it by running diagnostics, but it will come back if the problem remains. Resets do not create heat. The control will detect the same issue again. Fixing the cause is the only real reset.
Do I have to pull the dishwasher out completely?
Most tests require tipping the unit back, so yes. Some checks can be done from the door, but the heater and thermistor are underneath. Pulling it out carefully is part of doing the job right.
Is it worth repairing an older KitchenAid?
If the tub is solid and racks are decent, yes. Heating circuit repairs are common wear items. Compared to a new unit, parts are affordable. A good repair can give you years more service.
Can a clogged filter cause this code?
Not directly, but it contributes. A clogged filter causes long cycles and poor water movement. That stresses the heater and sensor. Keeping filters clean helps prevent heat related errors over time.


