
As an Amazon Associate, I earn from qualifying purchases at no extra cost to you.
Whirlpool Dishwasher Error Code E1: Fix It the Quick Way
 ByZayyan
The kitchen floor was a lake and the dinner party guests were still in the living room when I first saw that flashing E1 code. I remember pulling out my multimeter, kneeling in the mess, and realizing the float switch was jammed by a tiny piece of broken wine glass. That gritty reality is why I am here to help you stop the leaking and start the cleaning.
The core solution for an E1 error involves checking the water inlet valve and the overflow float assembly because this code specifically signals a “long fill” or a leak detection issue. You need to verify that your home water pressure is hitting at least 20 psi and that the inlet screen isn’t clogged with hard water deposits. If the valve is buzzing but no water enters, it is likely a mechanical failure requiring a direct replacement of the solenoid valve assembly.
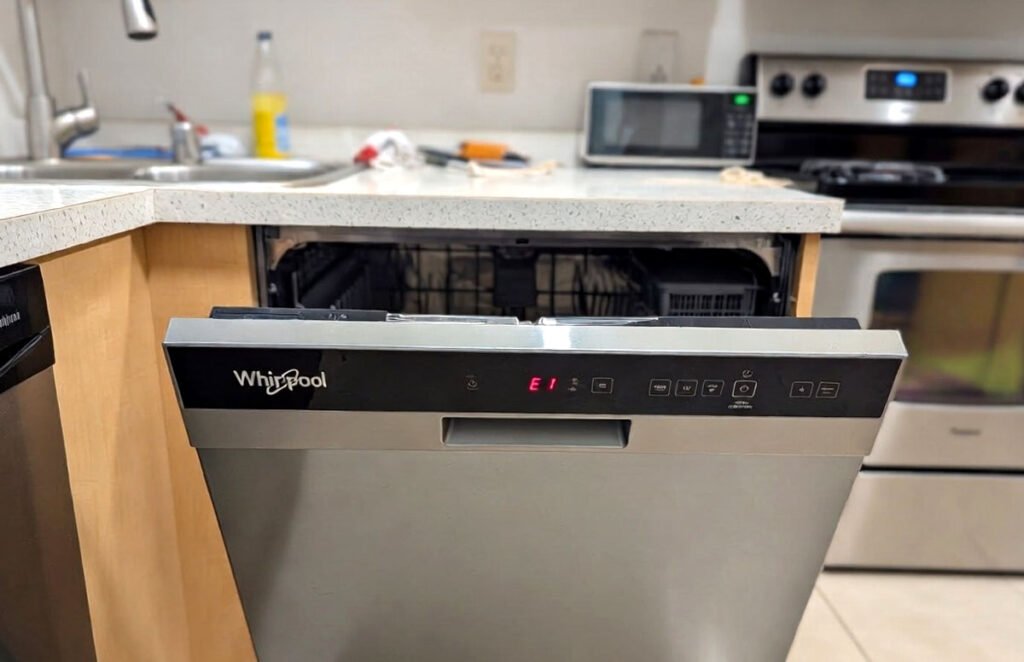
What is the Whirlpool Dishwasher Error Code E1?
The E1 error code is your dishwasher’s way of telling you that the internal computer has detected a problem with the water level or the time it takes to fill the tub. In my two decades of turning wrenches, I have seen this pop up when the machine expects the water to reach a certain height within a specific window, usually about four minutes, but the sensor stays dry. It is a protective measure designed to prevent the heating element from burning out or the motor from running without lubrication.
When this code flashes, the drain pump often kicks into high gear to evacuate any water it thinks might be overflowing. This happens because the control board receives a signal from the float switch indicating the water level is too high, even if the tub looks empty to your eyes. Sometimes the logic gets flipped, and a stuck float or a shorted sensor sends a false “flood” signal. This constant draining is a classic symptom that tells a pro exactly where to start looking under the kickplate.
You also have to consider the flow meter or the pressure switch depending on your specific Whirlpool model. If the water is actually flowing in but the machine does not “see” it, the E1 code will trigger as a timeout error. This is often caused by sediment from your water heater migrating into the delicate internal screens. It is frustrating to see a dry machine claiming it is full, but this error is actually saving you from a much more expensive repair down the line.
- A restricted or kinked water supply line behind the unit.
- The water inlet valve solenoid has suffered an electrical failure.
- Calcium buildup in the small mesh filter inside the valve.
- A stuck overflow float caused by food debris or a broken dish.
- Defective wiring harness connections between the sensor and the board.
- Low house water pressure preventing the tub from filling on time.
How to Fix the Whirlpool Dishwasher Error Code E1
Check the Overflow Float for Obstructions
Open the dishwasher door and look at the front left or right corner of the floor. You will see a small plastic dome or cylinder. This is the float. Reach down and lift it up and down. You should hear a distinct metallic click coming from the switch underneath the tub. If it feels gummy or won’t move, something is stuck.
I often find a stray toothpick or a piece of plastic wrap wedged under this float. If the float is held in the “up” position, the machine thinks it is overflowing and will trigger the E1 code immediately. Clean the area with a damp cloth and some vinegar to remove any sticky residue that might be holding the plastic piece in place.
Checking this first saves you from pulling the whole machine out of the cabinet. It is the simplest mechanical fix in the book. If the float moves freely but you do not hear the click, the microswitch underneath has likely failed. This switch is what tells the control board the physical status of the water level during the fill cycle.
- Locate the plastic float in the front corner of the tub.
- Clear any debris or food particles from underneath the dome.
- Ensure the float moves up and down without any resistance.
- Listen for the “click” of the microswitch during manual movement.
Test the Water Inlet Valve Solenoid
To get to the valve, you need to remove the bottom kickplate using a 1/4 inch nut driver. The valve is usually on the left side where your hot water line connects. Safety first, so make sure you turn off the power at the breaker and shut off the water supply valve under the sink before you start.
Once you have access, pull the two wires off the solenoid terminals. Set your multimeter to the Ohms setting to check for continuity. A healthy Whirlpool valve should read between 500 and 1,500 ohms. If your meter shows “OL” or an open circuit, the copper coils inside the solenoid have burned out, and no water will enter.
Replacing this part is a standard pro move. You will need a pair of pliers to slide the hose clamp back and a wrench to disconnect the brass fitting. Be prepared for a small amount of water to leak out when you break the seal. Keep a towel handy to catch the drips so they don’t hit the floor.
- Remove the lower kickplate with a 1/4 inch nut driver.
- Disconnect power and water before touching any electrical terminals.
- Use a multimeter to check the valve for proper resistance.
- Replace the valve if it shows no continuity or “OL.”
Inspect the Inlet Valve Filter Screen
Sometimes the valve is electrically fine but physically blocked. Disconnect the water supply line from the valve using an adjustable wrench. Look inside the hole where the water enters the valve. You will see a tiny, fine mesh screen. This screen is designed to catch sand and grit before it ruins your dishes.
If that screen is covered in brown gunk or white calcium flakes, water can’t get through fast enough. The dishwasher times out because it isn’t getting the volume it needs, resulting in the E1 error. Do not try to remove the screen, as you might puncture it. Instead, use a soft toothbrush and some white vinegar to gently scrub it.
If the screen is heavily impacted with mineral scale, it is usually better to just replace the whole valve. These screens are not meant to be replaced individually, and a tiny hole can let debris into the internal seals. A clean screen ensures a powerful flow that fills the tub in the required time. This keeps the control board happy and the cycle moving.
- Disconnect the hot water supply line from the dishwasher valve.
- Check the internal mesh screen for sediment or scale.
- Clean the screen gently with vinegar and a small brush.
- Avoid puncturing the mesh to prevent debris from entering.
Examine the Drain Hose for Siphoning
This is a technical detail many DIYers miss. If your drain hose is not installed with a “high loop” or connected to an air gap, the water can actually leak out as fast as it pumps in. This creates a siphoning effect. The machine fills and fills, but the water level never rises, leading to the E1 timeout error.
Check under your sink to see if the drain hose loops up higher than the entry point of the sink drain. It should be fastened to the very top of the cabinet. If the hose lays flat on the floor of the cabinet, gravity will pull the water out of the dishwasher prematurely. This is a common installation error I see.
Make sure the hose is not kinked or crushed behind the dishwasher. A restricted hose can cause backpressure that confuses the pressure sensors. If you see water standing in the bottom of the hose, ensure the connection to the garbage disposal is clear. A clogged disposal can also cause drainage issues that mimic fill errors in the system logic.
- Verify the drain hose has a high loop under the sink.
- Check that the hose is not kinked behind the machine.
- Ensure the garbage disposal knockout plug was fully removed.
- Inspect the hose for any internal blockages or heavy sludge.
Verify the Pressure Switch and Tubing
Some Whirlpool models use a pressure switch instead of a simple float. This switch is connected to a small translucent tube that runs to the bottom of the sump. As water fills the tub, air pressure builds up in the tube and trips the switch. If that tube is clogged with grease, the switch won’t activate.
You can find this tube underneath the unit. Gently pull it off the switch and blow through it. If you feel resistance or hear a gurgle, there is a blockage of old detergent or food. Clearing this out often solves the E1 error instantly. It is a messy job but much cheaper than buying new parts for the machine.
Check the switch itself for any signs of moisture or corrosion on the electrical tabs. Leaks from the pump seal can drip onto these components and cause a short circuit. If the switch is covered in white crusty remains, it has been getting wet for a while. Clean the terminals with electronic cleaner or replace the switch if the damage is severe.
- Locate the pressure switch and its small plastic air tube.
- Blow through the tube to clear any grease or debris.
- Check the electrical terminals for signs of water damage.
- Ensure the tube is tightly connected at both ends.
Reset the Main Control Board
If you have checked the hardware and everything seems fine, the computer might just be stuck in an error loop. Appliances today are basically tablets that wash plates, and sometimes they need a hard reboot. This is the “have you tried turning it off and on again” step of the professional appliance world.
Go to your home electrical panel and flip the breaker for the dishwasher to the off position. Leave it off for at least ten full minutes. This allows the capacitors on the control board to fully discharge and clears the temporary memory. Sometimes a power surge can cause a “ghost” E1 error that only a reset can fix.
After ten minutes, flip the breaker back on and try to start a new cycle. Watch the machine for the first five minutes to ensure it fills properly. If the code returns immediately, you may have a faulty control board or a wiring harness issue. However, a reset solves a surprising number of fill errors caused by minor software glitches.
- Turn off the dishwasher breaker at the main electrical panel.
- Wait at least ten minutes for the control board to discharge.
- Restore power and attempt to start a normal wash cycle.
- Monitor the initial fill phase to confirm the fix worked.
How Do I Prevent the E1 Error From Returning?
Prevention starts with the water you put into the machine. If you live in an area with hard water, those minerals are the number one enemy of your inlet valve and sensors. Using a high quality rinse aid and a monthly dishwasher descaler can prevent calcium from building up on the float and the internal screens. I always tell my clients that a five dollar bottle of cleaner once a month saves a three hundred dollar repair bill later.
You should also be mindful of how you pre-rinse your dishes. While you don’t need to scrub them sparkling clean, leaving large chunks of food or toothpicks on the plates is a recipe for disaster. These small items can bypass the main filters and get stuck under the overflow float. Once that float is wedged, your machine is essentially paralyzed until you manually reach in and clear the obstruction from the mechanical assembly.
Finally, keep an eye on your sink drainage. Your dishwasher and sink usually share the same exit path. If your sink is draining slowly, it can cause backflow into the dishwasher which triggers the E1 leak detection. Regularly cleaning your garbage disposal and ensuring your drain lines are clear will keep the pressure levels inside the dishwasher consistent. This harmony between your plumbing and your appliance is the secret to a long, error-free life.
- Use a monthly citric acid based dishwasher cleaner.
- Always use a rinse aid to prevent mineral spotting.
- Scrape off large food particles before loading the racks.
- Check the drain filter at the bottom weekly for debris.
- Ensure the sink and garbage disposal stay clear of clogs.
- Avoid using too much detergent to prevent oversudsing issues.
Final Thoughts
Dealing with an E1 error is a rite of passage for many Whirlpool owners, but it doesn’t have to ruin your week. By following these steps, you are doing exactly what I would do if I were standing in your kitchen. Take your time, stay safe with the power off, and trust your gut. You have the tools and the knowledge now to get that machine running perfectly again.
| Step Name | Difficulty Level | Parts Needed | Pro Tip |
| Float Check | Easy | None | Jiggle the float to hear the click. |
| Valve Testing | Medium | Multimeter | Check for 500-1500 Ohms. |
| Screen Cleaning | Easy | Vinegar, Brush | Don’t poke holes in the mesh. |
| Power Reset | Easy | None | Wait 10 minutes for a full reset. |
Frequently Asked Questions (FAQs)
Is it safe to run the dishwasher with an E1 code?
No, it is not advisable to keep running the machine because the E1 code indicates a problem with the water supply or level. If the machine runs without enough water, the pump motor can overheat and the heating element may burn out. Most Whirlpool models will actually lock you out of the controls until the error is cleared anyway.
Can I fix the E1 error without any tools?
You can perform basic checks like clearing the float or resetting the breaker without any tools. However, to properly diagnose a failing water inlet valve or to inspect the internal wiring, you will need a 1/4 inch nut driver and a multimeter. Many times, a simple cleaning of the float area solves the problem instantly.
Do I need to replace the control board for an E1?
It is very rare that the control board is the primary cause of an E1 error. Usually, the board is just reporting a real physical problem with the water flow or the sensors. I always recommend testing the inlet valve and the float switch first. Only consider the board if all other components test perfectly and the wiring is intact.
Is the E1 error common on newer Whirlpool models?
Yes, this is a standard error across many Whirlpool and Maytag platforms because they use similar fill logic. Newer models are more sensitive to water pressure fluctuations and sediment buildup than older machines. This sensitivity is meant to protect the high-efficiency motors and heaters from damage during the wash and dry cycles.
Can low water pressure cause the E1 code to appear?
Absolutely, low water pressure is a frequent culprit for the E1 timeout. If your house pressure drops below 20 psi, the dishwasher cannot fill the tub fast enough to satisfy the control board’s timer. This often happens if you are running a shower or the washing machine at the same time the dishwasher starts its fill.
Do I have to pull the dishwasher out to fix this?
In most cases, you can do all the necessary repairs from the front of the machine by removing the kickplate. You only need to pull the unit out if you discover a leak in the back or if you need to replace a damaged drain hose. This makes the E1 repair much easier than other internal motor issues.
Can using too much soap trigger an E1 error?
Yes, excessive soap suds can interfere with the pressure switch or float. The suds create an “air lock” or add weight to the float that tricks the sensors into thinking the water level is incorrect. If you see a lot of bubbles, run a rinse cycle with a bit of vegetable oil to break them down.
Is the water inlet valve expensive to replace?
The part itself is generally affordable, usually ranging between thirty and sixty dollars depending on where you buy it. It is a very common part that most appliance stores keep in stock. Replacing it yourself can save you well over a hundred dollars in professional labor fees and service call charges.


